
Often when a company wants to extend their SharePoint site to the extranet or internet, they’ll need to accommodate new users who are currently not in their company’s Active Directory. For instance, extending the application to the extranet to allow vendors to access product information, or extend to the internet to allow customers to log in and access order info and status.
SharePoint 2010 has a great feature called Claims Based Authentication. You specify this when you create your web application. If you created a web application as Classic Mode Authentication, you can change it to Claims Based Authentication, see this blog post http://weblogs.asp.net/sreejukg/archive/2011/03/25/change-sharepoint-authentication-from-classic-mode-to-claims-based.aspx on how to change it.
Our plan of attack is
- Install the .Net SQL Membership Provider tables in SQL.
- Modify your web application, central admin and the web services’ web.config files.
- Update web application to use forms.
- Install free feature to add user management to SharePoint.
Install the .Net SQL Membership Provider tables in SQL.
This is rather easy.
- Run C:\Windows\Microsoft.NET\Framework64\v4.0.30319\aspnet_regsql.exe
- In the wizard, enter in a new database name, I named mine CBAUsers.
- After it completes, go into SQL and ensure the farm accounts have rights to database.
- Run this quick script in the new database to create a user for testing
 declare @now datetime
 set @now= GETDATE()
 exec aspnet_Membership_CreateUser 'CBA','admin1','pass@word1','','admin1@contoso.com','','',1,@now,@now,0,0,null
Modify your web application, central admin and the web services’ web.config files.
This part can be a little tricky. We need to modify the web.config file for your
- Web Application so your web app can authenticate users
- Central Administration so users are recognized
- Web Services so users can log in.
Update the web application’s web.config file.
IMPORTANT: These steps will have to be completed on every web front end in your farm.
- Go to C:\inetpub\wwwroot\wss\virtualdirectories\appname.
- Copy the web.config to web.config_preCBA as a backup.
- Open the web.config file.
- Find </configSections> and add the following right after it
<connectionStrings>
<add name="SQLAuthConnectionString" connectionString="Data Source=OPTIMUS;Integrated Security=SSPI;
Initial Catalog=CBAUsers" />
</connectionStrings>
- Find <roleManager add the following provider highlighted
<roleManager defaultProvider="c" enabled="true" cacheRolesInCookie="false">
<providers>
<add name="c" type="Microsoft.SharePoint.Administration.Claims.SPClaimsAuthRoleProvider,
Microsoft.SharePoint, Version=14.0.0.0, Culture=neutral, PublicKeyToken=71e9bce111e9429c" />
<add connectionStringName="SQLAuthConnectionString" applicationName="CBA" description="Stores and
retrieves roles from SQL Server" name="SQLRoleManager" type="System.Web.Security.SqlRoleProvider,
System.Web, Version=2.0.3600.0, Culture=neutral, PublicKeyToken=b03f5f7f11d50a3a" />
</providers>
</roleManager>
- Find <membership and add the following provider highlighted
<membership defaultProvider="i">
<providers>
<add name="i" type="Microsoft.SharePoint.Administration.Claims.SPClaimsAuthMembershipProvider,
Microsoft.SharePoint, Version=14.0.0.0, Culture=neutral, PublicKeyToken=71e9bce111e9429c" />
<add connectionStringName="SQLAuthConnectionString" passwordAttemptWindow="5"
enablePasswordRetrieval="false" minRequiredPasswordLength="6" minRequiredNonalphanumericCharacters="0"
enablePasswordReset="false" requiresQuestionAndAnswer="true" applicationName="CBA"
requiresUniqueEmail="true" passwordFormat="Hashed" description="Stores and Retrieves membership data
from SQL Server" name="SQLMembershipProvider" type="System.Web.Security.SqlMembershipProvider,
System.Web, Version=2.0.3600.0,Culture=neutral, PublicKeyToken=b03f5f7f11d50a3a" />
</providers>
</membership>
The above specifies your password requirements and complexity.
That should do it there.
Update central admin’s web.config file
IMPORTANT: These steps will have to be performed on all servers hosting central admin.
- Go to C:\inetpub\wwwroot\wss\virtualdirectories\portnum.
- Copy the web.config to web.config_preCBA as a backup.
- Open the web.config file.
-
Perform the same steps above on this web.config file.
- The roleManager and membership sections may look a little different. You’re only adding the highlighted elements, not modifying it to match.
And that should take care of your Central Admin.
Update web services’ web.config file
IMPORTANT: These steps will have to be completed on every web front end in your farm.
- Go to C:\Program Files\Common Files\Microsoft Shared\Web Server Extensions\14\WebServices\SecurityToken.
- Copy the web.config to web.config_preCBA as a backup.
- Open the web.config file.
- Find <configuration> (top of page) and add the following right after it
<connectionStrings>
<add name="SQLAuthConnectionString" connectionString="Data Source=OPTIMUS;Integrated Security=SSPI;
Initial Catalog=CBAUsers" />
</connectionStrings>
- Find </configuration> (bottom of page) and add the following right above it
<system.web>
<roleManager enabled="true" cacheRolesInCookie="false" cookieName=".ASPXROLES" cookieTimeout="30"
cookiePath="/" cookieRequireSSL="false" cookieSlidingExpiration="true" cookieProtection="All"
createPersistentCookie="false" maxCachedResults="25">
<providers>
<add connectionStringName="AspNetSqlMembershipProvider" applicationName="/" name="AspNetSqlRoleProvider"
type="System.Web.Security.SqlRoleProvider, System.Web, Version=2.0.0.0, Culture=neutral,
PublicKeyToken=b03f5f7f11d50a3a" />
<add connectionStringName="SQLAuthConnectionString" applicationName="CBA" description="Stores and
retrieves roles from SQL Server" name="SQLRoleManager" type="System.Web.Security.SqlRoleProvider,
System.Web, Version=2.0.3600.0, Culture=neutral, PublicKeyToken=b03f5f7f11d50a3a" />
</providers>
</roleManager>
<membership userIsOnlineTimeWindow="15" hashAlgorithmType="">
<providers>
<add connectionStringName="AspNetSqlMembershipProvider" enablePasswordRetrieval="false"
enablePasswordReset="true" requiresQuestionAndAnswer="true" passwordAttemptWindow="10"
applicationName="/" requiresUniqueEmail="false" passwordFormat="Hashed" name="AspNetSqlMembershipProvider"
type="System.Web.Security.SqlMembershipProvider, System.Web, Version=2.0.0.0, Culture=neutral,
PublicKeyToken=b03f5f7f11d50a3a" />
<add connectionStringName="SQLAuthConnectionString" passwordAttemptWindow="5" enablePasswordRetrieval="false"
enablePasswordReset="false" requiresQuestionAndAnswer="true" applicationName="CBA" requiresUniqueEmail="true"
passwordFormat="Hashed" description="Stores and Retrieves membership data from SQL Server"
name="SQLMembershipProvider" type="System.Web.Security.SqlMembershipProvider, System.Web,
Version=2.0.3600.0,Culture=neutral, PublicKeyToken=b03f5f7f11d50a3a" />
</providers>
</membership>
</system.web>
And now we’re done with the tricky part.
Update web application to use forms.
Next we’re going to tell Central Admin about our desires and tell the web application to use our configured authentication.
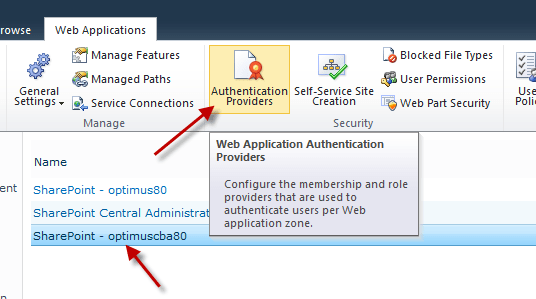
- Go to Central Administration > Manage Web Applications.
- Select your web application and click Authentication Providers.
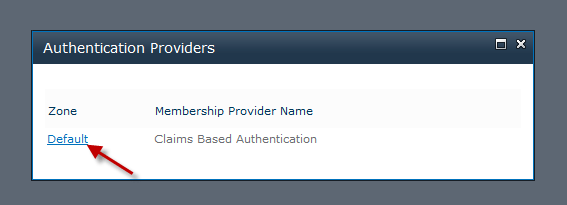
- Click the zone marked as Claims Based Authentication
- Scroll down to Claims Authentication Type.
- Check Enable Forms Based Authentication, and enter SQLMembershipProvider and SQLRoleManager in the two options

- Scroll to the bottom and click Save.
- Close the Authentication Providers window.
Browse to your site and if you’re lucky, you should see a login prompt, and you should be able to login as the user we created before or a Windows account.

Pretty plain eh? Check out my other blog post on how to customize this page some more.
Install free feature to add user management to SharePoint.
Go to http://sharepoint2010fba.codeplex.com/ and download and install the feature. Once it’s activated on your site, you’ll have the options in site settings to manage your FBA users. I won’t go into how to install and use this add on since it’s documented on its site.

