A little while ago, I asked ChatGPT how to get started using NodeJS with OpenAI. I was excited about its answer:
If you’ve arrived here just googling for an answer, don’t use this code:
const openai = require('openai');
openai.apiKey = 'YOUR_API_KEY';

const prompt = 'What is the capital of France?';
const model = 'text-davinci-002';

openai.Completion.create({
  prompt: prompt,
  model: model,
  api_version: 'v1'
}, function(error, response) {
  if (!error) {
    console.log(response.choices[0].text);
  }
});
I threw that code into my IDE and it didn’t work. I got some errors, null references. We all know ChatGPT isn’t perfect, it’s not always right. But who is?
I checked out the documentation on OpenAI.com and that code worked much better. Also, since I asked the above question, the ChatGPT APIs were released!
Let’s go!
Prerequisites
You should have some knowledge of NodeJS, the basics of how scripts work, how to run them, etc.
Make sure Node is installed, I’m running on v16.18.
I’ll be using VSCode as my IDE, I recommend installing that.
Sign up for a developer account with OpenAI.com.
That should do it, but I’m sure I’m missing something else about my environment, throw any questions below in the comments and I’ll answer as fast as I can.
The Code
You can get the code on GitHub for part 1. You will need to add your own .env file to store your OpenAI API Key.
WATCH: Connecting to ChatGPT APIs with NodeJS
And follow along below.
Install libraries for OpenAI
ChatGPT got one thing right, the name of the library.
To get started, create a new folder in your environment and install openai and dotenv so we can reference our environment files.
npm i openai dotenv
Easy.
I also install nodemon as that helps with rapid nodejs development, I highly recommend it.
npm i nodemon -g
Set up environment
Right now, you probably have a rather empty folder, except for a node_modules folder and a couple of package files.
Let’s add a file that will run the script, call it index.js.
Also, add a .env file to store your API key. If you’re using source control, make sure to add the .env file to your .gitignore file so your key is not committed anywhere.
Get your OpenAI API Key
Go to platform.openai.com and sign in.
After you log in, you’re in the OpenAI developer space. Documentation, examples, and even a playground to generate code are all in here!

Spend some time later exploring the site, but for now, click on your name in the top right, and select View API Keys.
Click Create new secret key. This will generate the key immediately.
COPY YOUR KEY AND SAVE IT. You will not be able to get to this same key again. I store my keys in LastPass.
Back to code!
Put your API key into the .env file. Edit that file so that it stores your key in OPENAI_API_KEY. It will look something like:
OPENAI_API_KEY=xx-xxxxx
Again, if you’re using source control, make sure to ignore this file so git doesn’t store your API key.
Make an API call to ChatGPT
Now edit the index.js file, and copy and paste this block of code:
require('dotenv').config();
const { Configuration, OpenAIApi } = require("openai");

const configuration = new Configuration({
  apiKey: process.env.OPENAI_API_KEY,
});


const openai = new OpenAIApi(configuration);
const messages = [
  { role: 'user', content: 'write a whimsical poem about darth vader' }
];

const doIt = async () => {
  try {
    const completion = await openai.createChatCompletion({
      model: 'gpt-3.5-turbo',
      messages
    });
    console.log(completion.data);
    console.log(completion.data.choices[0].message);

  } catch (error) {
    if (error.response) {
      console.error(error.response.status, error.response.data);
    } else {
      console.error(`Error with OpenAI API request: ${error.message}`);
    }
  }
}

doIt();
Before we run it, let me walk through what it’s doing:
- After we import our necessary libraries, we immediately configure the OpenAI library.
- The
dotenvlibrary allows us to useprocess.envto get values from our.envfile.
- The
- Then we create a new
openaiobject which is our primary object for working against the APIs. - We create our
messagesobject, and notice that’s an array with aroleandcontent. More on that shortly. - I put most of the code in this little asynchronous function called
doIt(). I wanted it to be an async function. so that I canawaitresponses.- I prefer
awaitover managing promises with chaining.then(). You’ll seedoIt()is called right after the function so it runs when the script runs. By all means, if you like chaining promises, go for it!
- I prefer
- Within
doIt()wecreateChatCompletion, basically, we send our chat to the ChatGPT API and get our response.- We are sending it two parameters:
- The
modelwe want to use:gpt-3.5-turbo. OpenAI explains this model will be kept up to date. - The
messagesis our object that has our message to send to ChatGPT.
- The
- We are sending it two parameters:
- Then I have two
console.logfor logging the objects in the response, which we’ll see below. - I also have some basic error handling just in case.
I hope all that makes sense. Let’s run it! With any luck, this should run and return a response from ChatGPT!
Run this using nodemon, so any subsequent changes we make will auto-reload the script for us.
nodemon index.js
And you should see output similar as:
{ // first console.log
  id: 'chatcmpl-6qLRid5j3kmS9E1paabjMnZKlT0HX',
  object: 'chat.completion',
  created: 1677933514,
  model: 'gpt-3.5-turbo-0301',
  usage: { prompt_tokens: 17, completion_tokens: 128, total_tokens: 145 },
  choices: [ { message: [Object], finish_reason: null, index: 0 } ]
}
{ // second console.log
  role: 'assistant',
  content: '\n' +
    '\n' +
    'Darth Vader, oh Darth Vader,\n' +
    'a feared figure in space so far,\n' +
    'with his breathing so loud yet tender,\n' +
    'he commands with his darthly bar.\n' +
    '\n' +
    'His black cape billows in the wind,\n' +
    'his lightsaber glowing red,\n' +
    "with his helmet on, he's quite the fiend,\n" +
    'but perhaps misunderstood instead.\n' +
    '\n' +
    'For underneath that dark attire,\n' +
    'lies a man with a broken heart,\n' +
    'who once upon a time was admired,\n' +
    'before he and the Jedi did part.\n' +
    '\n' +
    'So let us not judge Darth Vader,\n' +
    'solely by his menacing guise,\n' +
    'for within him lies a fable,\n' +
    'of redemption and true goodbyes.'
}
There are two console.log in the code above, so we’re getting 2 outputs.
- The first one is the data we get back from the API. Interestingly there is the
usageparam. We will talk about tokens later, but keep in mind there are limits to what we can send into ChatGPT and the OpenAI APIs. - The second is the actual content of the response. This is the first item in the array that lives in
response.data.choices.
Go ahead and change the message to whatever you’d like!
Have a conversation with the ChatGPT API
The above is great, but how do we have a conversation with ChatGPT? Rather simple. We need to pass the previous text threads back to the API. The OpenAI documentation explains chat completions really well. The Tl; Dr; version of it is below.
For ChatGPT to keep the context of our conversation, we tell it our conversation. Given the above example, I will append the response we get to my messages object and send it with a new message.
const messages = [
  { role: 'user', content: 'write a whimsical poem about darth vader' },
  {
    role: 'assistant',
    content: '\n' +
      '\n' +
      'Darth Vader, oh Darth Vader,\n' +
      'a feared figure in space so far,\n' +
      'with his breathing so loud yet tender,\n' +
      'he commands with his darthly bar.\n' +
      '\n' +
      'His black cape billows in the wind,\n' +
      'his lightsaber glowing red,\n' +
      "with his helmet on, he's quite the fiend,\n" +
      'but perhaps misunderstood instead.\n' +
      '\n' +
      'For underneath that dark attire,\n' +
      'lies a man with a broken heart,\n' +
      'who once upon a time was admired,\n' +
      'before he and the Jedi did part.\n' +
      '\n' +
      'So let us not judge Darth Vader,\n' +
      'solely by his menacing guise,\n' +
      'for within him lies a fable,\n' +
      'of redemption and true goodbyes.'
  },
  { role: 'user', content: 'give me some titles for this poem' }
];
Then we get back
{
  role: 'assistant',
  content: '1. The Darth Vader Paradox\n' +
    '2. The Mysterious Enigma of Darth Vader\n' +
    '3. Darth Vader: The Dark Knight\n' +
    '4. The Redemption of Darth Vader\n' +
    '5. The Tragic Tale of Darth Vader\n' +
    '6. The Enchanting Legend of Darth Vader\n' +
    '7. The Haunting Aura of Darth Vader\n' +
    '8. Darth Vader: The Misunderstood Master\n' +
    '9. The Lament of Darth Vader\n' +
    '10. The Introspective Journey of Darth Vader'
}
Your conversation can just keep piling on top of itself.
ChatGPT Message Roles: user, assistant, and system
You may have noticed the role parameter in our messages object. Our prompts have the role of user, and the response from ChatGPT is assistant. If that isn’t self-explanatory, let me try to explain it:
- The
userrole is you, the user. That’s what we’re saying to ChatGPT. - The
assistantrole is ChatGPT’s response, it’s the AI telling us what it thinks about what we said.
There is also a system role, which we didn’t use, but is good to know exists. The system role tells the assistant how to behave. For example, the system could say You are a bitter Star Wars fan or you are a 40-plus year old star wars nerd living in his parent\'s basement. Funny, it doesn’t seem to do anything different with those, maybe it doesn’t know. But you can see differences between you are a second grader and you are a senior in high school.
Side note, this is where I believe we’re going to see an uptick in jobs. Learning how to talk to AI and how best to get content out of AI. I think I saw this called “prompt engineering”. It’ll take the human creative touch to do it right!
We add the system role at the top of our message object:
const messages = [
  { role: 'system', content: 'you are a senior in high school'},
  { role: 'user', content: 'write a whimsical poem about darth vader' }
];
Give that a try, and compare it to being a second grader. Impressively we get different responses!
Instructing ChatGPT through the assistant
You may use the assistant role to tell ChatGPT how you’d like to see responses. Let’s change up our message some. When we submit the following:
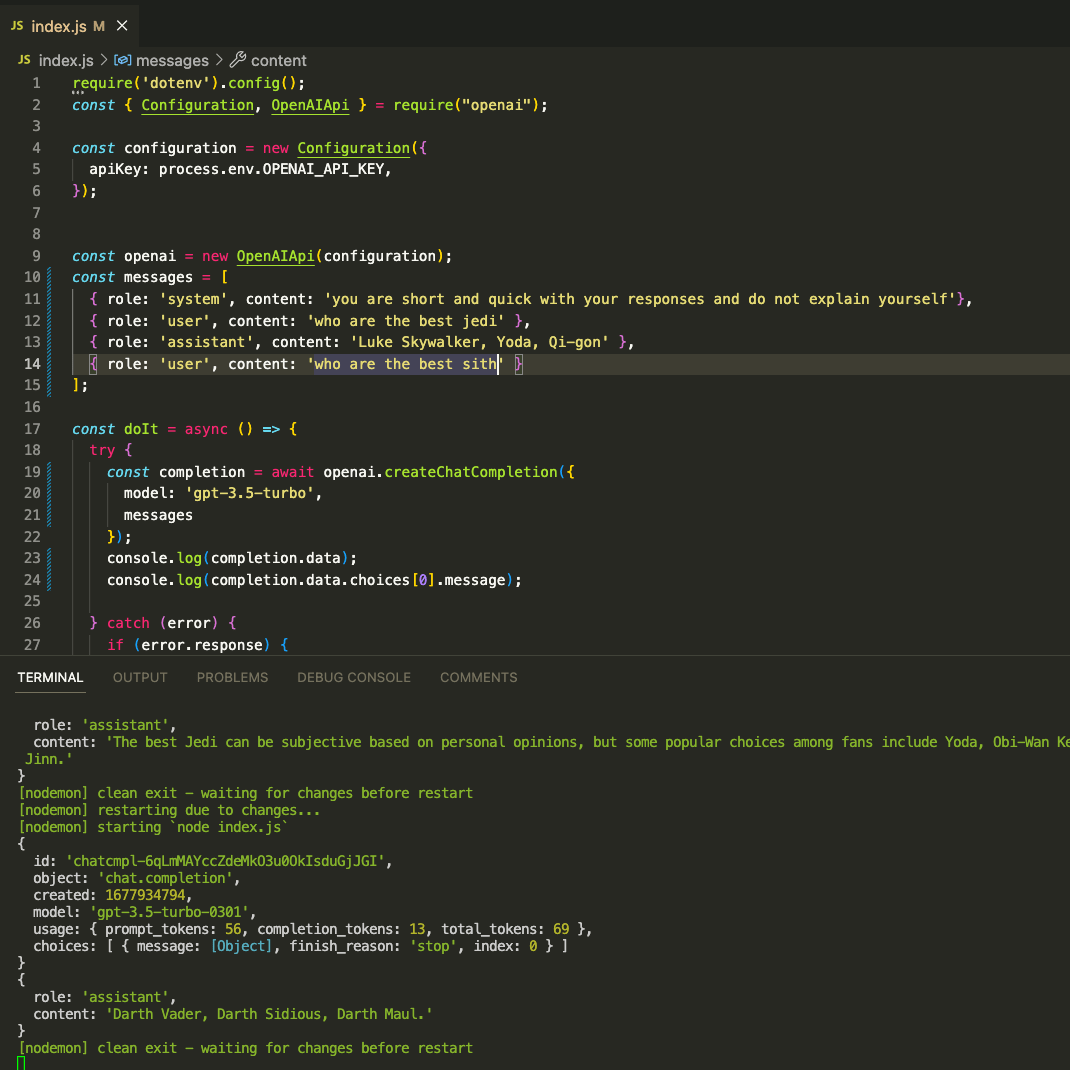
const messages = [
  { role: 'system', content: 'you are short and quick with your responses and do not explain yourself'},
  { role: 'user', content: 'who are the best jedi' }
}
Our response:
{
  role: 'assistant',
  content: 'The best Jedi can be subjective based on personal opinions, but some popular choices among fans include Yoda, Obi-Wan Kenobi, Luke Skywalker, and Qui-Gon Jinn.'
}
We get back an answer. But if we want to tell ChatGPT how we want that answer formatted, we can provide an example like:
const messages = [
  { role: 'system', content: 'you are short and quick with your responses and do not explain yourself'},
  { role: 'user', content: 'who are the best jedi' },
  { role: 'assistant', content: 'Luke Skywalker, Yoda, Qi-gon' },
  { role: 'user', content: 'who are the best sith' }
];
The above assistant role was defined by me, which was not a previous response from ChatGPT. I think this is important to point out. We can train ChatGPT by telling it how we want it to respond.
Then you’ll see the response is very similar to the instruction:
{
  role: 'assistant',
  content: 'Darth Vader, Darth Sidious, Darth Maul.'
}
Again, try it out and play with it. The fun with AI is learning how it thinks and what we can do to manipulate it into what we need from it!
ChatGPT API Pricing
Before we wrap up, we should keep in mind how much the above cost us. The pricing is available at openai.com/pricing. The ChatGPT model we’re using above is $0.002 per 1,000 tokens (more on tokens in a moment). The free tier gets $18 per month. You can see your current usage in the developer dashboard (click your name and select Manage Account) or go to the usage dashboard.
Here’s my view after playing with the above for this post:

The existing $1.33 on my account was from trying out other, more expensive, models last month.
Notice there’s no bump in the chart for today’s (March 4th) experimentation! All in it looks like I used roughly 3,500 tokens, rounding up this cost me about $0.008. PAH! Not even a penny yet. At this rate, I’ll be below my free tier for a while.
OpenAI Tokens
Pricing is based on tokens. It somehow magically translates text to tokens, and throttles and governs the APIs based on tokens. They explain it further here in the FAQs. Roughly, for English, 750 words are about 1,000 tokens.
Remember back to the usage param we saw earlier:
usage: { prompt_tokens: 17, completion_tokens: 128, total_tokens: 145 }
Every request has tokens in the prompt and the response (the completion), and then we get the total of both. This total is what counts against the pricing. Notice the image above from the dashboard, the token count includes the prompt and the completion there as well.
The pricing model varies based on the model in use. Above, we’re using gpt-3.5-turbo which costs $0.002 per 1,000 tokens. Their other models range from $0.0004 to $0.02 per 1,000 tokens.
So how much will your messages cost you? They have a tokenizer tool that you can dump your text into and get a token count for. There are also libraries that we can use in code to tokenize our text as well. We’ll explore that in another post, more to come!
Explore more with ChatGPT
This was a solid start! Let’s pause here and celebrate what we’ve been able to accomplish in just a few minutes!
- Installed the openai libraries
- Connected to the ChatGPT model
- Had a conversation with ChatGPT
- Instructed the ChatGPT model to further refine what we want
- Reviewed (and understood) tokens and pricing
Grab my code on GitHub, and don’t forget your .env file!
Have some fun, play with it, and learn more about the nuances of how and what we can instruct ChatGPT. As you can see, there’s a lot we can do from here. Where do you want to take your new ability to talk with ChatGPT?
Here’s where I want to grow with this, more posts coming soon:
- Move this to a lambda function
- Create a basic UI with ReactJS
- Manage the conversation for the user (don’t want to pass the entire convo back and forth from the front end to the API)
- Manage token sizes
- Host it all in AWS using SAM
- Use AWS Cognito to add authentication so my app doesn’t get spammed
- Add a pricing and cost monitor
Not sure if we’ll accomplish all of this in this specific order, but my end goal is to create my own chat UI starter pack. I have a couple of other little ideas to build on top of this as well!
Subscribe to my blog and get posts like this in your inbox. Share your email below, or follow me on Threads, LinkedIn, or BlueSky.


Leave a Reply