
Day 17 of Advent of Code is here!
See all of my other solutions here. If you’re interested, check out what my colleagues at Slalom are doing with their Advent of Code! You can see this and my other solutions on github.
Do your best!
I highly encourage you to get through the day’s challenge on your own. Certainly refer to this and other’s examples to help you get through it. I would love to hear how you did! Did you find a better approach than I did? Do tell!
There’s a lot of looping in this one, were you able to get away from so many?
Day 17: Conway Cubes
Part I
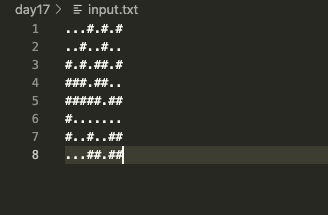
Here’s my data
Not a lot. Following the rules, we need to loop through this one slice of a cube 6 times.
Let’s import the data and do a little manipulation on it
const fs = require('fs');
const lines = fs.readFileSync('./input.txt', 'utf-8').trim().split('\n').map(row => row.split('').map(v => v === '.' ? false : true));
Right in the import, I’m mapping . to false, and # will be true. This will make comparisons much easier later
Now we create our cube “object”, well, an array in an array in an array
const cube = [lines]
/*
  cube will look like
  [ [ [ false, true, false ], [ false, false, true ], [ true, true, true ] ] ]
        \_x_/  \_x_/  \_x_/     \_x_/  \_x_/  \_x_/    \_x_/  \_x_/ \_x_/  - columns/cells
         \_______y_______/       \_______y_______/      \_______y______/   - rows
          \______________________________z____________________________/    - slices
  cube[z][y][x]
  cube[0][0][0] === false
  cube[0][1][2] === true
*/
That make sense? The first array is z, which contains multiple arrays y, which contains multiple x which is our active/inactive flags. Note the naming on the right, that’s how I went about naming my objects
I then instantiate two variables
let sublength = cube[0].length

let theCube = [...cube]
sublength will be used to instruct the code how far to expand the cube on each iteration. theCube is a copy of cube that we’ll be manipulating.
for(let loop = 0; loop < 6; loop += 1) {
  theCube.forEach((slice, sindex) => {
    console.log('z=', sindex)
    slice.forEach((row, rindex) => {
      console.log(row.map(v=> v ? '#' : '.').join(''))
    })
    console.log('')
  })
Let’s loop, the requirement is to loop 6 times, phew, nice and easy (can’t wait for Part 2 to go to a ton more, I expect…). The little block of code there just logs out what the cube looks like, outputting each slice of the cube and what is active or inactive. This helped tremendously in troubleshooting the looping.
  sublength += 2

  const newY = Array.from({length: sublength} , (v) => false)
  const newZ = Array.from({length: sublength}, (v) => [...newY])
Next we increment the sublength by two. This cube is infinite, but we only deal with the data touching our potentially active cells, so we just need to go out 1 more layer outside of the cube. Thinking 3 dimensionally, when something expands, it grows up and down, left and right, forward and backward. It grows in two directions, so we increment by 2.
Then we create the new layers that will be added to the outside of the cube. All values are defaulted to false.
  const newCube = []
  newCube.push([...newZ])
  theCube.forEach((slice, index) => {
    const newSlice = []
    newSlice.push(newY)
    slice.forEach(row => {
      const newRow = []
      newRow.push(false)
      newRow.push(...row)
      newRow.push(false)
      newSlice.push(newRow)
    })
    newSlice.push(newY)
    newCube.push(newSlice)
  })
  newCube.push([...newZ])
Now let’s expand this cube
- I create a
newCube, and push in a new growth slice, anewZ(expands 1 on Z) - Then loop through
theCubeand fill in the other existing slices - As we do, I push a
newYfirst into the slice (expands 1 on Y) - Next, let’s fill in the current cube.
- Since this slice has to grow, we add 2 new cells, one before and one after the data, to grow this slice. (expands 2 on X)
- Then we push in another
newYinto the slice (expands 1 on Y) - and finally push another
newZinto thenewCube(expands 1 on Z)
After the first iteration, our little 3x3x3 cube is now 5x5x5.
  const aCube = newCube.map((slice, sindex) =>
    slice.map((row, rindex) =>
      row.map((cell, cindex) => {
        const activeNeighbors = findActiveNeighbors(newCube, sindex, rindex, cindex)
        if(cell) {
          if (activeNeighbors === 2 || activeNeighbors === 3) return true
          return false
        }
        if(!cell) {
          if (activeNeighbors === 3) return true
          return false
        }
      })
    )
  )
Now we loop through all the slices, rows, and cells to find if anything should change to active or inactive
- We call
findActiveNeighbors(below) sending in the array and the current location of the cell to find all 26 neighbors (yes, 26, think of it as the center of a cube, there are 9 above, 9 below, and 8 all round it on the same level) - With the provided count of neighbors, we determine if this cell is now active or inactive
const findActiveNeighbors = (myCube, sindex, rindex, cindex) => {
  let count = 0
  const smax = sindex + 1 > myCube.length - 1 ? myCube.length - 1 : sindex + 1
  const rmax = rindex + 1 > sublength - 1 ? sublength - 1 : rindex + 1
  const cmax = cindex + 1 > sublength - 1 ? sublength - 1 : cindex + 1
  const smin = sindex === 0 ? 0 : sindex - 1
  const rmin = rindex === 0 ? 0 : rindex - 1
  const cmin = cindex === 0 ? 0 : cindex - 1

  for(let si = smin; si <= smax; si += 1) {
    for(let ri = rmin; ri <= rmax; ri += 1) {
      for( let ci = cmin; ci <= cmax; ci += 1) {
        if(si === sindex && ri === rindex && ci === cindex) continue
        if(myCube[si][ri][ci]) count += 1
      }
    }
  }
  return count
}
Before we can just loop through the neighbors, we need to establish where the neighbors are. If we’re working with a cell that has any index of 0, then there are no neighbors below that, we can’t go negative with arrays. And if any index exceeds the size of the array, we can’t go higher than that. Once that’s all established, we loop!
You’ll see I do add a check if the current position in the loop matches the cell we’re checking for, we ignore it’s state.
  theCube = aCube
}
To wrap up this loop, we reset theCube to be aCube (our newly updated cube) and loop again.
console.log(theCube.join().match(/true/ig).length)
Finally, we print out the answer. Here I join() the entire array. This will flatten out the entire array, all layers and loops, to a single long string of trues and falses. I then use a little regex to match on true to get the count.
Part II
Thankfully, Part 2 doesn’t want to know the number after several more loops. Instead, we want a 4-dimensional cube.

Crazy right? Basically, in the cube, at any coordinate will contain another cube. AoC calls this a “hypercube”. Yes, it can be mindblowing, but if you can keep it that simple, basically another array of arrays, it’s pretty straight forward.
In Part 2, I did a lot of renaming of variables as my names before didn’t fit, but at the core, the code is the same, except for the newly added array
const cube = [[lines]]
/*
  cube will look like
  [ [ [ [ false, true, false ], [ false, false, true ], [ true, true, true ] ] ] ]
          \_x_/  \_x_/  \_x_/     \_x_/  \_x_/  \_x_/    \_x_/  \_x_/ \_x_/  - columns/cells
           \_______y_______/       \_______y_______/      \_______y______/   - rows
            \______________________________z____________________________/    - slices
             \_____________________________w___________________________/     - twilight zone
  cube[w][z][y][x]
  cube[0][0][0][0] === false
  cube[0][0][1][2] === true
*/
let sublength = cube[0][0].length
Note the first line is now putting the lines object into two arrays before it puts it into cube
let newYTemplate = Array.from({length: sublength}, () => false)
let newZTemplate = Array.from({length: sublength}, () => [...newYTemplate])
let newWTemplate = Array.from({length: sublength}, () => [...newZTemplate])

let theCube = []
for(let i = 0; i < sublength; i += 1) {
  theCube.push(newZTemplate)
  if(sublength / i === 2) {
    theCube.push(cube[0][0])
    i += 1
  }
}
theCube = [newWTemplate, theCube, newWTemplate]
We then need to make this hypercube. You’ll notice a my new template for W, the outermost array. W contains an array of Z which contains an array of Y which contains an array of X (as false).
This next block then creates theCube and pushes in newZTemplates and right in the middle pushes our data into it. Finally it pads that with two other newWTemplate making the hyper cube.
for(let loop = 0; loop < 6; loop += 1) {
  theCube.forEach((twilight, windex) => {
    twilight.forEach((slice, zindex) => {
      console.log('z=', zindex, 'w=', windex)
      slice.forEach((row, yindex) => {
        console.log(row.map(v=> v ? '#' : '.').join(''))
      })
      console.log('')
    })
  })
Same 6 looper. This initial logging block changed to include the 4th dimension, similar to their examples.
  sublength += 2
  newYTemplate = Array.from({length: sublength}, () => false)
  newZTemplate = Array.from({length: sublength}, () => [...newYTemplate])
  newWTemplate = Array.from({length: sublength}, () => [...newZTemplate])
Again, we create templates based on the sublength plus 2 (remembering it grows outwards in two directions). You’ll also see a template for W.
  const newCube = []
  newCube.push([...newWTemplate])
  theCube.forEach(w => {
    const newW = []
    newW.push([...newZTemplate])
    w.forEach(z => {
      const newZ = []
      newZ.push(newYTemplate)
      z.forEach(y => {
        const newY = []
        newY.push(false)
        newY.push(...y)
        newY.push(false)
        newZ.push(newY)
      })
      newZ.push(newYTemplate)
      newW.push(newZ)
    })
    newW.push([...newZTemplate])
    newCube.push(newW)
  })
  newCube.push([...newWTemplate])
Just like part 1, we now push and add the existing cube, while expanding it. Here we have to account for the 4th dimension W.
  const aCube = newCube.map((twilight, windex) =>
    twilight.map((slice, zindex) =>
      slice.map((row, yindex) =>
        row.map((cell, xindex) => {
          const activeNeighbors = findActiveNeighbors(newCube, windex, zindex, yindex, xindex)
          if(cell) {
            if (activeNeighbors === 2 || activeNeighbors === 3) return true
            return false
          }
          if(!cell) {
            if (activeNeighbors === 3) return true
            return false
          }
        })
      )
    )
  )
Again, we loop through the hypercube, taking into account that little 4th dimension, calling findActiveNeighbors (below) and determine the same rules and outcome.
const findActiveNeighbors = (myCube, windex, zindex, yindex, xindex) => {
  let count = 0
  const tmax = windex + 1 > myCube.length - 1 ? myCube.length - 1 : windex + 1
  const smax = zindex + 1 > myCube[0].length - 1 ? myCube[0].length - 1 : zindex + 1
  const rmax = yindex + 1 > sublength - 1 ? sublength - 1 : yindex + 1
  const cmax = xindex + 1 > sublength - 1 ? sublength - 1 : xindex + 1
  const tmin = windex === 0 ? 0 : windex - 1
  const smin = zindex === 0 ? 0 : zindex - 1
  const rmin = yindex === 0 ? 0 : yindex - 1
  const cmin = xindex === 0 ? 0 : xindex - 1

  for(let ti = tmin; ti <= tmax; ti += 1) {
    for(let si = smin; si <= smax; si += 1) {
      for(let ri = rmin; ri <= rmax; ri += 1) {
        for( let ci = cmin; ci <= cmax; ci += 1) {
          if(ti === windex && si === zindex && ri === yindex && ci === xindex) continue
          if(myCube[ti][si][ri][ci]) count += 1
        }
      }
    }
  }
  return count
}
Virtually the same as Part 1, except for the W index being added.
  theCube = aCube
}

console.log(theCube.join().match(/true/ig).length)
We finish the loop by resetting theCube to the new aCube and loop. Once all that is done, let’s write our answer in the same way.
For all the crazy looping, I was surprised to see part 2 finished in 5-6 seconds!
How did it go for you?
How did you find the answer on your own? How did you do it? Anything stump you? I’d love to hear how you did! Please comment below! I have also loaded up just the challenge and code from this and my other days on github, you can follow along there too: pretty Git pages or the code in the repo.


Nice write up. It seems that most people took a similar approach looking at various blogs etc. One thing which can make life easier is to avoid arrays and use a Dictionary (hashmap, key/value data structure, etc) of [(x,y,z,w) : Bool] which allows for negative values and keeps things a bit simpler. In this case where you only need to track active nodes you could even just use a set of active points as the main data structure (but that seemed a bit of a risk before we knew what part 2 was!). As both dictionaries and sets are usually O1 this can make things faster than arrays, and fit nicely with caching results too, although as Part 2 didn’t scale things up massively it wasn’t a problem for this one.
I’m still slowly creeping my way up your leaderboard :-)
LikeLike
I think going through day 17 I started seeing more about Dictionary, I considered a refactor but focused on just getting it to work instead. Thanks for the tip, I’ll make sure I check that out for any final days
LikeLike