


I shared a post a while ago on how to create a color coded calendar in SharePoint. This is a no code (for real!) solution, and I’ve received some great feedback from it. One area I want to focus on are the colors.
Let’s go from blah

To, well, more colorful, not sure if I’d call this awesome or not (my color matching skills are lacking)

If you haven’t noticed, there are some colors which are really close to each other, and could easily be mistaken for each other. It’s rather frustrating. Also, they’re all pastels, which is nice but what if I want it to pop on the page?
You can setup a custom style sheet on your calendar page to override the colors. Unfortunately, this will not change the colors at the time you setup the calendars. To keep your colors straight, here’s the colors, and their associated values:
See the close similarities? 1 and 3; 4 and 6; 7, 8 and 9. You only have 5 unique colors to work with.
As you create your color coded calendar, make note of the color #s you’re using, this will be important when creating the new color scheme. And since we’re talking about color schemes, I highly recommend using a comfortable color scheme. You don’t want your calendar to hurt your users. You may only want to change a few colors instead of the entire collection. There are a lot of color schemes and combos online, if you want to create your own, check out http://colorexplorer.com/. Take some time and figure out your ideal color scheme.
Now that you have your colors, let’s get started! First thing you want to do is follow my other post and make your color coded calendar, click here to open the post. Your end result should be a spread of drab pastel colors, like my first image on this post.
Okay, now that you have your color coded calendar, let’s change some colors! You don’t have to change every color in the list, or you may want to. Up to you. I’m going to change colors 3, 4, 8 and 9, and use some real colors that pop.
How? Magical CSS classes:
.ms-acal-color# {
 BACKGROUND-COLOR: #xxxxxx
}
.ms-acal-selcolor# {
 BACKGROUND-COLOR: #xxxxxx
}
.ms-acal-apanel-color# {
 BORDER-COLOR: #xxxxxx;
 BACKGROUND-COLOR: #xxxxxx;
}
The above 3 classes of styles represent one color. The first class is the color you see when the page loads, and you haven’t clicked on the item. The second is the selected color when you hover on it. The third class is the color in the legend, on the left of the calendar view.
See at the end of the class name, before the {, is a #. This is just a place holder, you’ll want to swap this out with the color above you want to change. For example, if you want to change color 4, you’d update your CSS like:
.ms-acal-color4, .ms-acal-selcolor4, and .ms-acal-apanel-color4
You can copy and paste the CSS as many times as you need, for numbers 1 through 9. Within each section you’ll see BACKGROUND-COLOR: #xxxxxx, and in the last CSS you’ll see BORDER-COLOR :#xxxxxx as well. This is where your new color scheme comes into play.
I’m going use this neat color scheme I quickly found:

Any scheme you find you’ll want to find the HTML, hexidecimal, or CSS value, for your colors (naming varies depending on the site you get it from). It’ll be a 6 character code, usually starting with #. Take the above CSS classes and create your new CSS classes using the colors your picked for your previously made calendar, and specify your own color palette. Here’s what mine will look like:
.ms-acal-color3{
 BACKGROUND-COLOR: #C0362C
}

.ms-acal-selcolor3{
 BACKGROUND-COLOR: #C0362C
}

.ms-acal-apanel-color3{
 BORDER-COLOR: #C3B7AC; BACKGROUND-COLOR: #C0362C;
}

.ms-acal-color4{
 BACKGROUND-COLOR: #816C5B
}

.ms-acal-selcolor4{
 BACKGROUND-COLOR: #816C5B
}

.ms-acal-apanel-color4{
 BORDER-COLOR: #C3B7AC; BACKGROUND-COLOR: #816C5B;
}

.ms-acal-color8{
 BACKGROUND-COLOR: #668D3C
}

.ms-acal-selcolor8{
 BACKGROUND-COLOR: #668D3C
}

.ms-acal-apanel-color8{
 BORDER-COLOR: #C3B7AC; BACKGROUND-COLOR: #668D3C;
}

.ms-acal-color9{
 BACKGROUND-COLOR: #007996
}

.ms-acal-selcolor9{
 BACKGROUND-COLOR: #007996
}

.ms-acal-apanel-color9{
 BORDER-COLOR: #C3B7AC; BACKGROUND-COLOR: #007996;
}
For the border color, I decided to go with a grey. Once you have your CSS together, let’s get it into SharePoint!
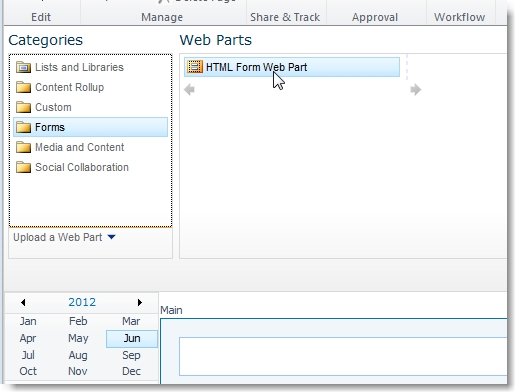
Browse to your color coded calendar.
- Click Site Actions, then Edit Page. This will switch the page into edit mode.
- Click Add a Web Part above the calendar.
- Select Forms in the Categories from the top left, then select HTML Form Web part. Click Add

- Hover over the web part and click on the web part menu, on the right

- The task pane will appear on the far right. Click Source Editor.
- Delete what’s in there now, and then type in:
<style type="text/css">
- Paste in your CSS.
- Type in at the bottom of the page
</style>
- You should see something similar to

- Click Save.
- You’ll see your new colors appear!!

- My text is hard to read. Fortunately from here I can use the full arsenal of CSS and change font colors, sizes, spacing, etc.
- To change the font color, add the following for each color number you want to change (#ffffff is white, you could use any color you want here as well.)
.ms-acal-color3 div, .ms-acal-color3 div a, .ms-acal-apanel-color3 SPAN {color: #ffffff !important} - Click OK in the task pane to close it. Click Stop Editing in the ribbon to stop page editing.


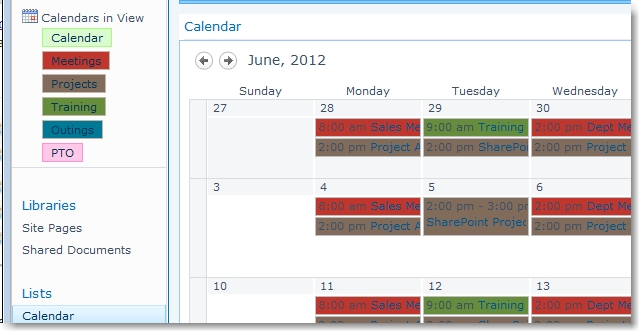
And here we have it!
You can also modify the default light green item by adding these CSS classes. However, if you do, make sure to put it at the top of your CSS text, also, in my case here, any colors not using a new color scheme, like my pink PTO, will be changed to whatever color you put here.
.ms-acal-item {
 BORDER: #xxxxxx; BACKGROUND-COLOR: #xxxxxx
}
.ms-acal-default-hover {
 BORDER: #xxxxxx; BACKGROUND-COLOR: #xxxxxx
}
.ms-acal-apanel-item {
 BORDER: #xxxxxx; BACKGROUND-COLOR: #xxxxxx
}
And if you want to change the default font color:
.ms-acal-item div, .ms-acal-item div a, .ms-acal-apanel-item SPAN
{ color: #xxxxxx !important}
Happy SharePointing!